

Version 7.4 and higher
The ‘Add’ action on the sessions overview is for creating a new session. It is also possible to add multiple sessions at once, depending on the recurrence you choose.
Required
- User right 21.1.1: ‘Add new session’
Entering session information
On the sessions overview, click the ‘Add’ action to open the ‘Add session’ page, where all information of the new session can be defined. The page is divided into 6 sections. Fields with an * are required.
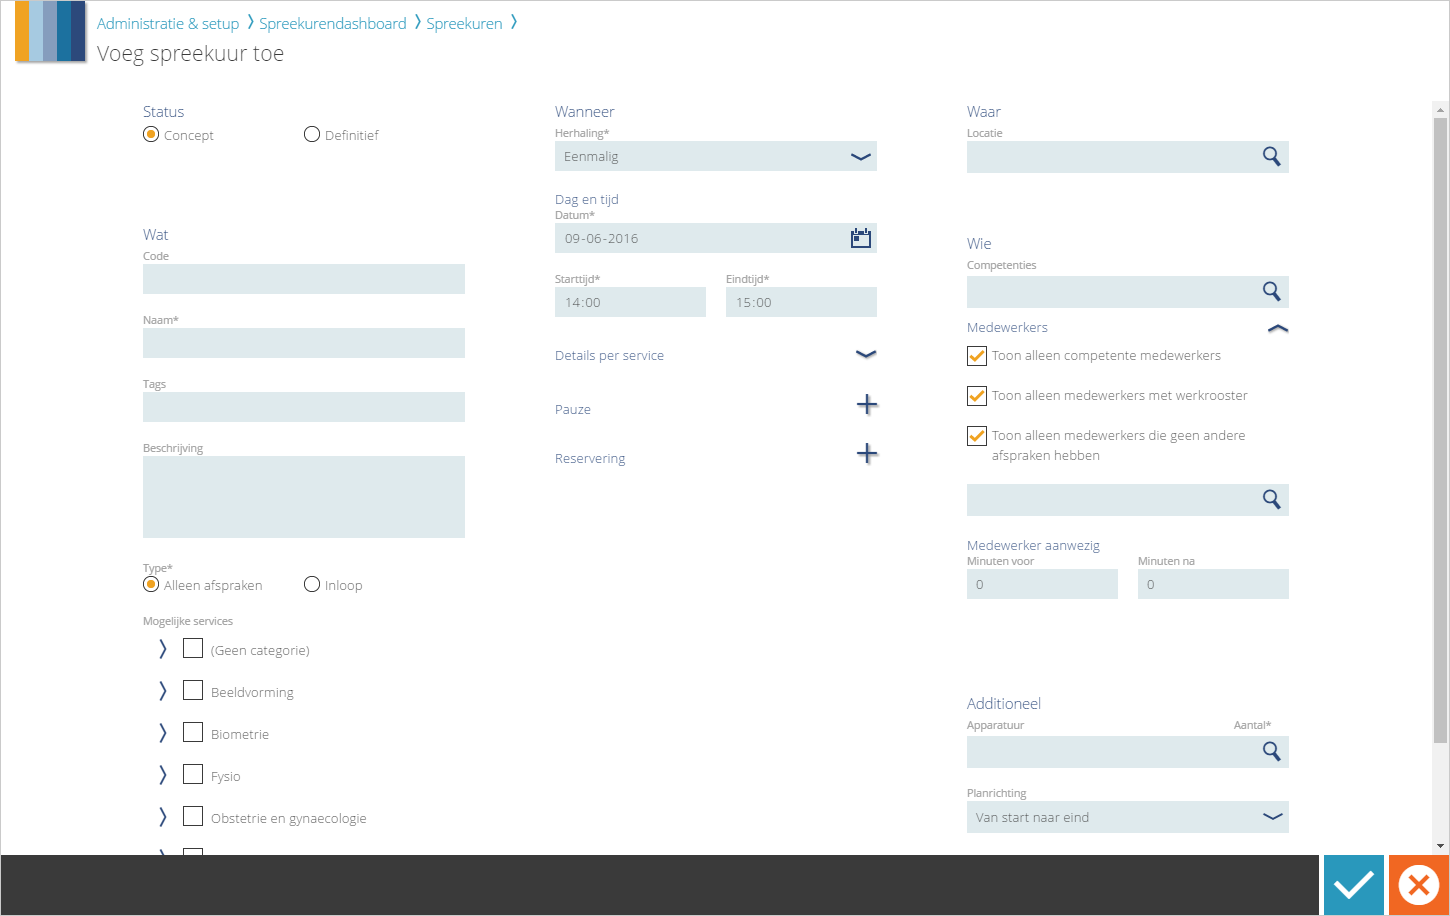
1. Status
First, the status of the session needs to be defined. ‘Draft’ means that the session still needs to be defined in more detail, or that the planner needs to check certain issues. It is not possible to plan appointments on a session with status ‘Draft’. Only when the status is ‘Final’, appointments can be planned.
There are three different statuses possible. Two of them are visible on the ‘Add session’ page, one is only visible on the ‘Edit session’ page.
- Draft. The session needs to be defined in more detail, or some issues need to be checked. A session with status ‘Draft’ is not open for planning. So for example, you can give this status to a session that still needs to have some things adjusted. Or you can create a session and leave it in draft, until the access time for the related services becomes too long.
- Final. A session needs to have status ‘Final’ to be able to plan appointments on it.
- (Only visible on the ‘Edit session’ page) Canceled. If a session cannot take place for whatever reason, the session can be canceled. Please note: If there are any appointments planned on the session, they will become invalid.
2. What
- Code: The code of the session. Anything can be filled in here, max. 10 characters.
- Name*: The name of the session. Anything can be filled in here, max. 100 characters.
- Tags: One or more tags can be assigned to the session. This property is mainly meant to make searching for specific sessions in the sessions overview easier.
- Description: Additional information about the session. If a session has a description, an icon will be shown next to the session’s name on the ‘Session planning board’ page. Click on the icon there to view the details of the session.
- Type*: The session’s type determines whether the plan engine can plan appointments on it. The plan engine can only plan appointments on sessions with type ‘Appointments only’. Manual appointment planning is possible on sessions with either type.
- Possible services: The services that can be delivered during the session. The services are grouped per service category. Services are only shown if they are valid on the start date entered in the ‘When’ section. Furthermore, if there is a location selected, only the services that are allowed on the selected location are shown.
As soon as a service is selected, its related competences and devices will be automatically selected, too. In the ‘Masterdata’ module is for each service defined what the related competences and devices are.
Attention!
It is possible that new services are added in the ‘Masterdata’ module after a session was created. These new services are not automatically added to the existing sessions, even if the new services are grouped under a service category that was selected in the session setup. That is why newly created services need to be added manually to already existing sessions. Please refer to Edit session.
Tip
If you enter the above fields in a clever way, searching sessions in the sessions overview becomes a lot easier. For example, you can include the name of a department in the name of the session, e.g. ‘Biometry session’. You can use the tags to mention the content of the session (‘Ultrasound’), the status of the session (‘Under construction’) or the day of the week (‘Monday’). Please note that if a recurrence is selected (see ‘When’), all resulting sessions will share the same details.
3. When
- Recurrence*: The recurrence type (once, daily, weekly, monthly or yearly). Choose ‘Once’ to create 1 session. Choose a recurrence (daily, weekly, monthly or yearly) to create multiple sessions in one go. All these sessions will share the same details. The entered validity (see below) determines how many sessions will be created.
Attention!
If you choose a recurrence, the sessions will all be saved as separate sessions. They will not be part of a ‘chain’. Therefore, sessions always need to be edited individually. It is possible to edit multiple sessions at once, but still it is recommended to not create too many sessions in advance.
- Every x weeks/months/years* (if a recurrence is chosen): How often the session needs to occur. Different types of recurrence can be chosen, for example:
- Every 2 days
- Every week on Wednesday
- Every 4 weeks on Monday and Tuesday
- Every month on day 15
- Every 3 months on the third Wednesday of the month
- Every 2 years on day 10 of February
- Every year on the first Sunday of November
- Date* (if ‘Once’ is chosen): The date of the session.
- Valid from* and Valid to* (if a recurrence is chosen): The period in which the sessions need to be created. For example, if you select a weekly recurrence on Thursdays and you choose a validity of today until 3 weeks in the future, then 3 sessions will be created (1 for each week). Please note that sessions will only be created for the days that were selected in the fields above. If you choose ‘Every month on day 3’ and a validity of January 10-20, no sessions will be created.
- Start time* and End time*: The time on which the session takes place.
Details per service
This section is for defining a specific timeframe for each selected service.
If there are services selected in the ‘What’ section, this section is expandable. For each service a start and end time is shown, which can be adjusted per service. For example: There is a session from 12:00 until 18:00. It might be the case that one specific service can only be delivered until 16:00, because the related urine test needs to be executed on the same day. In that case, you can adjust the time here.
This section is only used in case of exceptional situations, you can leave the times unchanged, too. Make sure the time frames always fall inside the times of the session.
Pause
It is possible to plan one or more break periods (pauses) in the session. The plan engine will not plan appointments on a pause, but it is possible to manually plan appointments on a pause period.
Click on  and enter the start and end time of the pause period. If desired, repeat this to add multiple pauses. To delete a pause, simply clear the start and end time fields, the fields will then disappear.
Reservation
Just like pauses, you can add one or more reservations to a session. Click on and enter the start and end time of the reserved timeslot. A reservation is blocked for appointments, for example to keep the timeslot free for emergency appointments. The description field can be used to enter a short note about the purpose of the reservation.
A reservation will not be regarded as available by the session appointment generator, and it will remain empty. You can only plan appointments on a reserved timeslot if you have user right 22.1.1 ‘Add items on blocked time slot’.
4. Where
- Location: The location where the session takes place. Only locations will be shown in the suggestion list if they are valid on the start date which is entered under ‘When’. If there are already some services selected, the locations that have these services in their list of ‘Possible services’ (see the ‘Locations’ module) will be shown with a little star icon.
If the status of the session is set to ‘Final’, the location field must be filled in.
If a location is selected, the list of services in the ‘What’ section will be filtered; only services that are allowed on the selected location will remain visible. If a service was already selected, it will always remain visible, but if it is not allowed on the selected location, it will turn red.
Tip
It is recommended to plan sessions only on locations that do not have a ‘child’ location. This way, a session will always be planned on a specific location or room.
5. Who
- Competences: The competences that are required for the employee(s) who is/are going to carry out the session. As described above, the competences are automatically filled in if a service which requires a competence is selected. If desired, extra competences can be selected manually, or the number can be changed. For example: 1 doctor and 2 assistants.
Attention!
If services are selected or deselected in the ‘What’ section, the manually added competences will be overwritten. Only the competences that are by default related to the selected services will be selected then. For this reason, wait with the manual adjustments to the competences section until the very end. This also applies to the devices section under ‘Additional’.
- Employees: The employee(s) who is/are going to carry out the session. In order to make it easier to find suitable employees, three checkboxes are selected by default: ‘Competent employees only’, ‘Employees with work schedule only’ and ‘Employees without other appointments only’. These checkboxes affect which employees are visible in the suggestion list. For example: If competence A is selected and ‘Competent employee only’ is checked, only employees who have competence A can be chosen. Deselect ‘Competent employees only’ to also view employees without competence A. If an employee is selected who is not competent, does not have a work schedule, or does have other appointments, the employee name will be shown in red.
Employee present
- Minutes before and Minutes after: The number of minutes before and after the session that the employee needs to be present. This time can be used to, for example, set up the required equipment before the session, or clean up afterwards. The time will be blocked in the employee agenda, which makes him/her ‘occupied’. For example, if a session takes place from 12:00 until 14:00 and the employee has to be present 30 minutes in advance, the employee will be occupied from 11:30 until 14:00.
6. Additional
- Devices: The devices that are needed for carrying out the session. As described above, the devices are automatically filled in if a service which requires a device is selected. If desired, extra devices can be selected manually, or the number can be changed.
If a device is of type ‘Appointment bound’, the entered number will affect the number of appointments that can be planned with the related service. For example, in the ‘Masterdata’ module is defined that service ‘Event recording’ requires the device ‘Event recorder’. For a certain session the service ‘Event recording’ is selected, and the device ‘Event recorder’ is selected 3x. In that case, a maximum of 3 appointments with service ‘Event recording’ can be planned on this session.
Attention!
As with competences, the manually added devices will be overwritten if services are selected or deselected in the ‘What’ section. Only the devices that are by default related to the selected services will be selected then. For this reason, wait with the manual adjustments to the devices section until the very end.
- Plan direction: How the plan engine should fill the session. Choose an option from the list:
- From start to end: The plan engine will plan the first appointment at the very start of the session. The following appointments will be planned right after the previous. This option will result in an efficient planning, with as few ‘gaps’ as possible.
- From the middle: The plan engine will plan the first appointment in the middle of the session and all the following appointments right before or after the previous.
- From end to start: The plan engine will plan the first appointment at the very end of the session and all the following appointment right before the previous.
- Do not plan consecutively: The plan engine will not stick to a specific order while planning appointments. This will result in ‘gaps’ between the appointments.
Save session
If all required fields are filled, the session or the recurrence of sessions can be added by clicking on the  button. Make sure that all the error messages are resolved before saving. See also Session error messages and validation status.
Attention!
If you selected a recurrence in the ‘When’ section, a multitude of separate sessions will be created. Each session will appear on a new row in the table on the sessions overview. After saving, these sessions are technically not related anymore; they will not be part of a ‘chain’.